


What’s a microinverter?
Solar microinverter is a device that converts direct current (DC) electricity generated by a single solar panel into alternating current (AC) electricity.
How do solar microinverters work?
1. DC input: The DC power generated by the solar panels is transmitted to the microinverter through cables.
2. Maximum power point tracking (MPPT): The microinverter usually contains a maximum power point tracker, which monitors the output voltage and current of the solar panels to ensure that the maximum possible power is extracted from the solar panels.
3. DC/AC Convertion: The microinverter converts DC power into AC power. In this process, it needs to adjust the output voltage and frequency to match the standard voltage and frequency of the home or commercial power grid (for example, Europe is usually 230V/50Hz, and the United States is usually 120V/60Hz).
- Synchronization and grid connection: The microinverter must ensure that the generated AC power is synchronized with the grid, and automatically stop working to ensure safety when the grid voltage is unstable or power outages.
Differences between microinverter and traditional string inverter
Microinverter is much smaller than string inverter, making them easier to install and O&M. Microinverter can also improve the efficiency of solar power systems because they can independently convert the direct current generated by each solar panel into alternating current. This helps prevent voltage differences between panels, thereby increasing power generation.
| Difference | Microinverter | String Inverter |
| Connection Method | One-to-one connection with a single panel | Connects to a string of multiple panels |
| Installation Difficulty | Small, lightweight, flexible and easy to install | Larger size, requires centralized installation, more difficult |
| Cost | Higher cost per watt; total investment about 30% higher | Lower cost per watt; total investment is lower |
| Reliability | Single unit failure doesn't affect the whole system; easy maintenance | Failure affects the whole string; maintenance is complex |
| Monitoring Capability | Can monitor single panel performance | Only monitors overall performance of the string |
| Efficiency Performance | High efficiency in real scenarios (especially in environment with shadow) | Slightly higher efficiency in ideal unshaded scenarios |
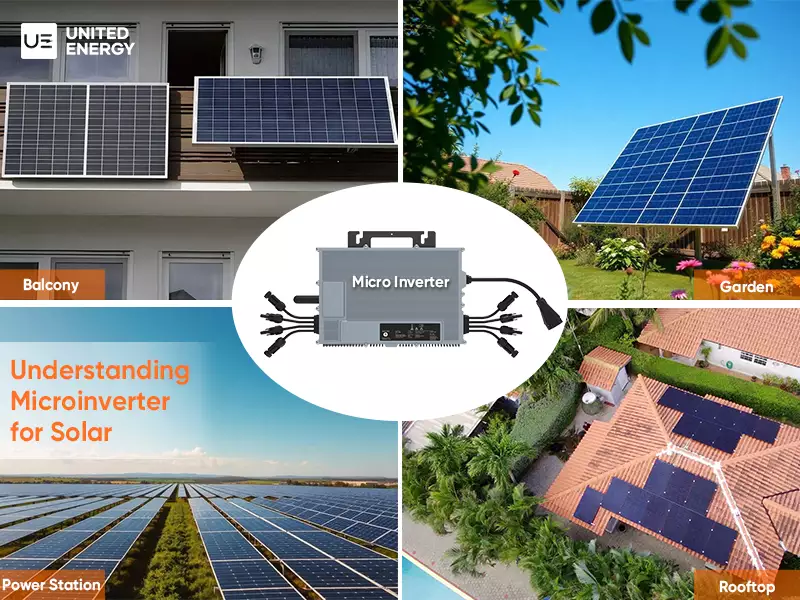
Suitable Scenarios of microinverter
Microinverters shine in specific scenarios where their unique strengths—like handling shading, flexibility, and panel-level control—make them the best fit. Here are their key use cases:
Residential rooftops
Many homes have rooftops with partial shading from chimneys, roof vents, nearby trees, or neighboring buildings. Microinverters minimize efficiency drops from such shading, ensuring each solar panel works at its best. Their small size also fits well on small or irregularly shaped residential roofs.
Small commercial spaces
Cafes, small offices, or local shops with limited roof space benefit from microinverters. These settings often have scattered shading (e.g., from signboards or adjacent structures), and microinverters prevent one shaded panel from slowing the whole system.
Systems with mixed panels
Useful when panels differ in age, brand, or performance. They adjust each panel independently to avoid efficiency loss.
Projects needing expansion
Easy to add more panels later—just pair new panels with new microinverters, no need to change a central inverter.
Product Overview
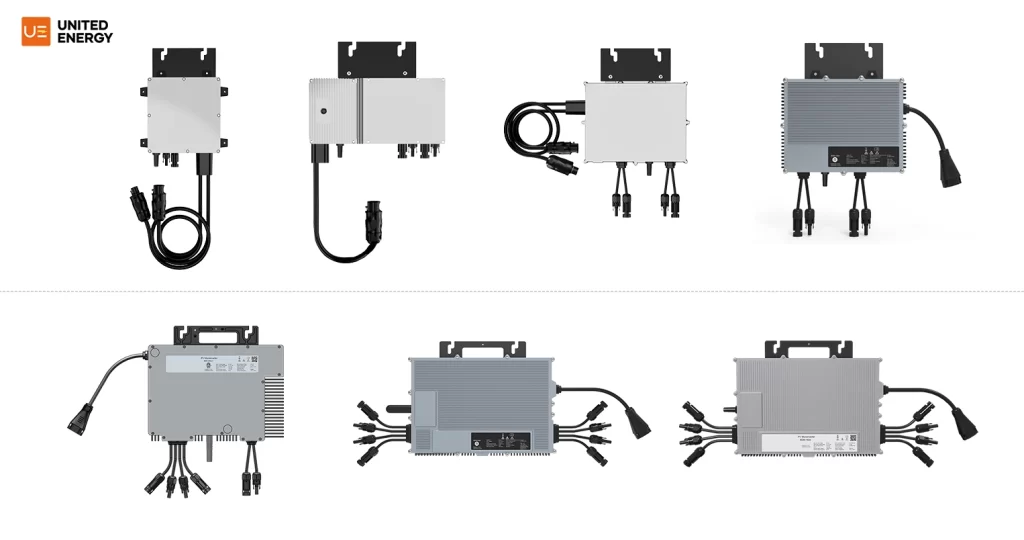
Advantage of UE’s Microinverters
- MPPT tracking efficiency up to 99.5%
- Maximum DC input voltage is 60V, equipped with various protections such as GFDI, surge protection
- IP67 protection level, 12 years warranty with 25 years extension
- Panel level monitoring with built-in PLC and WiFi communication
- Real-time control of power plant operation status
- Accurate to every minute of data
- Automatic high temperature and fault warning
- Precise location of fault points
How to connect microinverter to grid?
Required Parts:
Microinverters, PV modules, racking, and associated mounting hardware
Microinverter installation kit: Male protective end cap, mounting bracket (adapter plate)
AC branch circuit junction box, trunk cable, strain relief fitting (3/8-inch diameter)
Safety Precautions (Must Follow):
Disconnect all AC/DC power sources before starting installation to avoid electric shock.
Do not touch live components during work.
Follow local electrical codes for grounding and circuit protection.
Installation Steps
1. Install the AC Branch Circuit Junction Box
Check site AC service to ensure it matches local grid specs (e.g., 240V AC single-phase in North America, 230V in Europe).
Mount the adapter plate on the PV racking (typically at the end of module rows).
Attach the junction box to the adapter plate.
Connect the AC interconnect cable to the junction box using a 3/8-inch strain relief fitting to secure the cable.
Grounding: Connect the junction box and racking to the system's grounding conductor (per local codes) for safety.
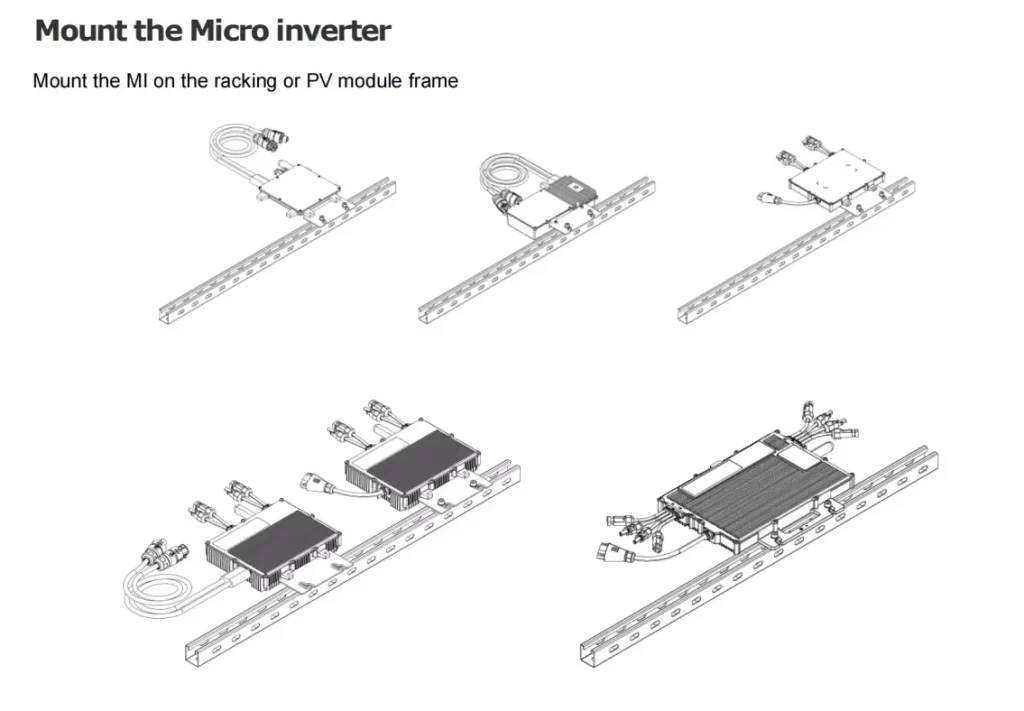
2. Mount the Microinverters to the Racking
Mark centers of each PV module on the racking, avoiding obstructions (e.g., module junction boxes).
Spacing rules:
At least 0.75 inches between the roof and the bottom of the microinverter.
At least 0.5 inches between the back of the PV module and the top of the microinverter.
Do not mount in long-term direct sunlight.
Use racking vendor-recommended hardware to mount one microinverter at each marked position (aligned with its paired PV module).
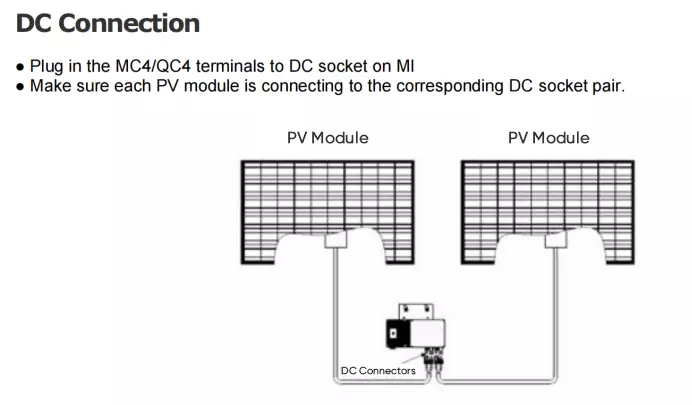
3. Connect PV Module to Microinverters (DC Connection)
After mounting, connect the PV module's DC output wires (positive/negative) to the microinverter's DC input terminals. Ensure correct polarity (mismatched polarity can damage PV modules).
4. Interconnect Microinverters into an AC Branch
Each microinverter has an AC output cable with a T-connector. Plug this into the trunk cable's socket to form a continuous AC branch circuit.
Check the trunk cable's rating label for the maximum number of microinverters allowed per branch—do not exceed this limit.
Use the male protective end cap from the kit to seal unused T-connectors or the trunk cable end (prevents moisture/dust ingress).
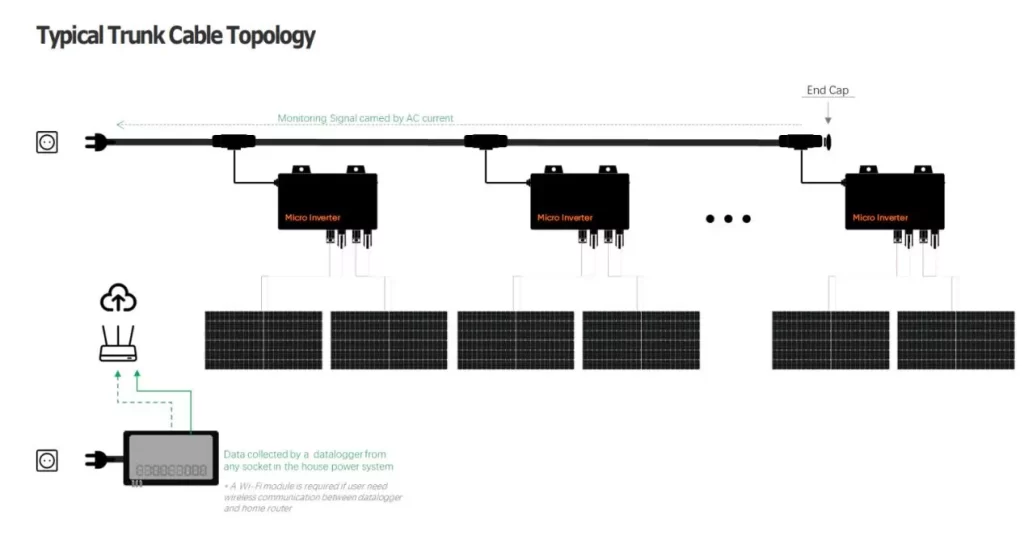
5. Connect to the Main Grid
From the AC branch circuit junction box, connect the trunk cable to the home’s main electrical panel via a dedicated grid-tie circuit breaker (compliant with local codes). This ensures safe power flow to the grid.
6.Connect to Cloud monitoring platform
With our APP, you can register your account and login, create PV plant and add device. Very simple for you to manage a lot of PV plants.

7. Final Checks
Verify all DC/AC connections are secure and polarity is correct.
Confirm grounding is properly installed (per local standards).
In summary, microinverters have revolutionized solar energy systems by addressing key challenges like shading and scalability. Their ability to optimize individual panel performance makes them a smart choice for diverse settings, from homes to small businesses. As solar technology advances, microinverters will continue to play a vital role in making renewable energy more efficient, reliable, and accessible for everyone.